Monday, 7 February 2011

A note on vegetable stock

Vegetable stock is a hard one to get right, but once you've got the hang of it it's brilliant.  I made mine using the following:

  • 1 litre water
  • Pepper (NOT salt)
  • 2 x onions
  • 3 x leeks
  • 5 x carrots
  • 2 x celery sticks
  • 3 x mushrooms
  • 8 (yes 8) x whole garlic cloves
  • 1/2 can of tinned tomatoes
  • 2 tbsps vegetable oil
  • 2 x bay leaves
  • Parsley sprig
This was what I had to hand, but I recommend saving veg trimmings in a bag in the freezer so that you can make a nice stock with it at some point in the future.

Roughly chop up all your veg and fry it (including all the trimmings, skin etc) in a heavy-based pan.  When the oniony stuff has all gone soft, add the tinned tomatoes.  Break them down a bit and then add the water, the bay leaves, the parsley sprig and a little bit of pepper.  Bring it to the boil and then reduce to a simmer for about half an hour, skimming scum from the surface every now and then.  Strain it into a jug and let it cool, then put it in the fridge (where it will keep for a few days) or put it in the freezer (where it will keep for a few months).

Your stock will probably be a light browny colour.  Don't be put off if it doesn't taste quite as strong as ready-made stock - this is because you haven't put any salt in.  And the reason you haven't put any salt in is that you will use this stock in recipes in which you will add salt so there's no point adding it now - you will only run the risk of making your recipes too salty.

Chunky vegetable soup with garlic croutons

Today was a very sad occasion - I learned of the death of Gary Moore and the publication of Kerry Katona's novel.  Good job I had lots of veg to hand for a nice comforting soup!

I know I always say this, but for this recipe you REALLY need the best, freshest veg and stock you can get.  I would even go as far as to say that you shouldn't even attempt it unless you've made a nice fresh vegetable stock otherwise it will just be bland and boring and you might as well eat bran flakes.  However, if you do have the right stuff for it it's delicious.  The garlic croutons are a fancy touch I thought I'd try - they worked well but feel free to use any kind of nice crusty bread.

NOTE: these ingredients are what I used, but you can use what you like as long as it's in season.  Just make sure you use the right quantity of veg per person by measuring using a bowl.

Ingredients (to serve four):
  • 1 x large onion
  • 1 x celery stalk, thoroughly cleaned - reserve the herby leaf
  • 1 x parsley sprig, 3 x sage leaves and some leaves from the celery tied into a bouquet garni
  • 1 x leek, thoroughly cleaned
  • 4 x large carrots
  • 1 x medium-large potato
  • 1 x celeriac
  • 2 tbsps rapeseed oil, plus extra for drizzling
  • 2 litres vegetable stock
  • Salt and freshly ground black pepper
  • French bread, to serve
  • 2 x garlic cloves, for the croutons
Method:
  1. Heat the rapeseed oil to a medium heat in a large heavy-based pan.
  2. Chop your onions, leek and celery into chunks and gently fry them in the oil.  You want to sweat them, not colour them, so that the resulting soup tastes fresh and zingy rather than roasted.
  3. Peel your carrots, potato and celeriac and reserve the peel for use in future stocks (i.e. put it in a bag and chuck it in the fridge).  Chop them into bite-size chunks and let them join in the party in your pan.
  4. When the onions, leeks and celery have gone soft and have started to turn transluscent it's time to pour in the stock.  Add a bit of salt and pepper and the bouquet garni.  Bring it to the boil and then simmer for about 20 minutes until the vegetables have all become tender.
  5. Cut diagonal slices of french bread, toast them and rub them with peeled garlic cloves - voila, you have garlic bread!
  6. Discard the bouquet garni.  Serve the soup in bowls with the croutons on the side and drizzle a little rapeseed oil over it.  When you get stuck in, it can be nice to break the croutons up and drop them into the soup.

Sunday, 6 February 2011

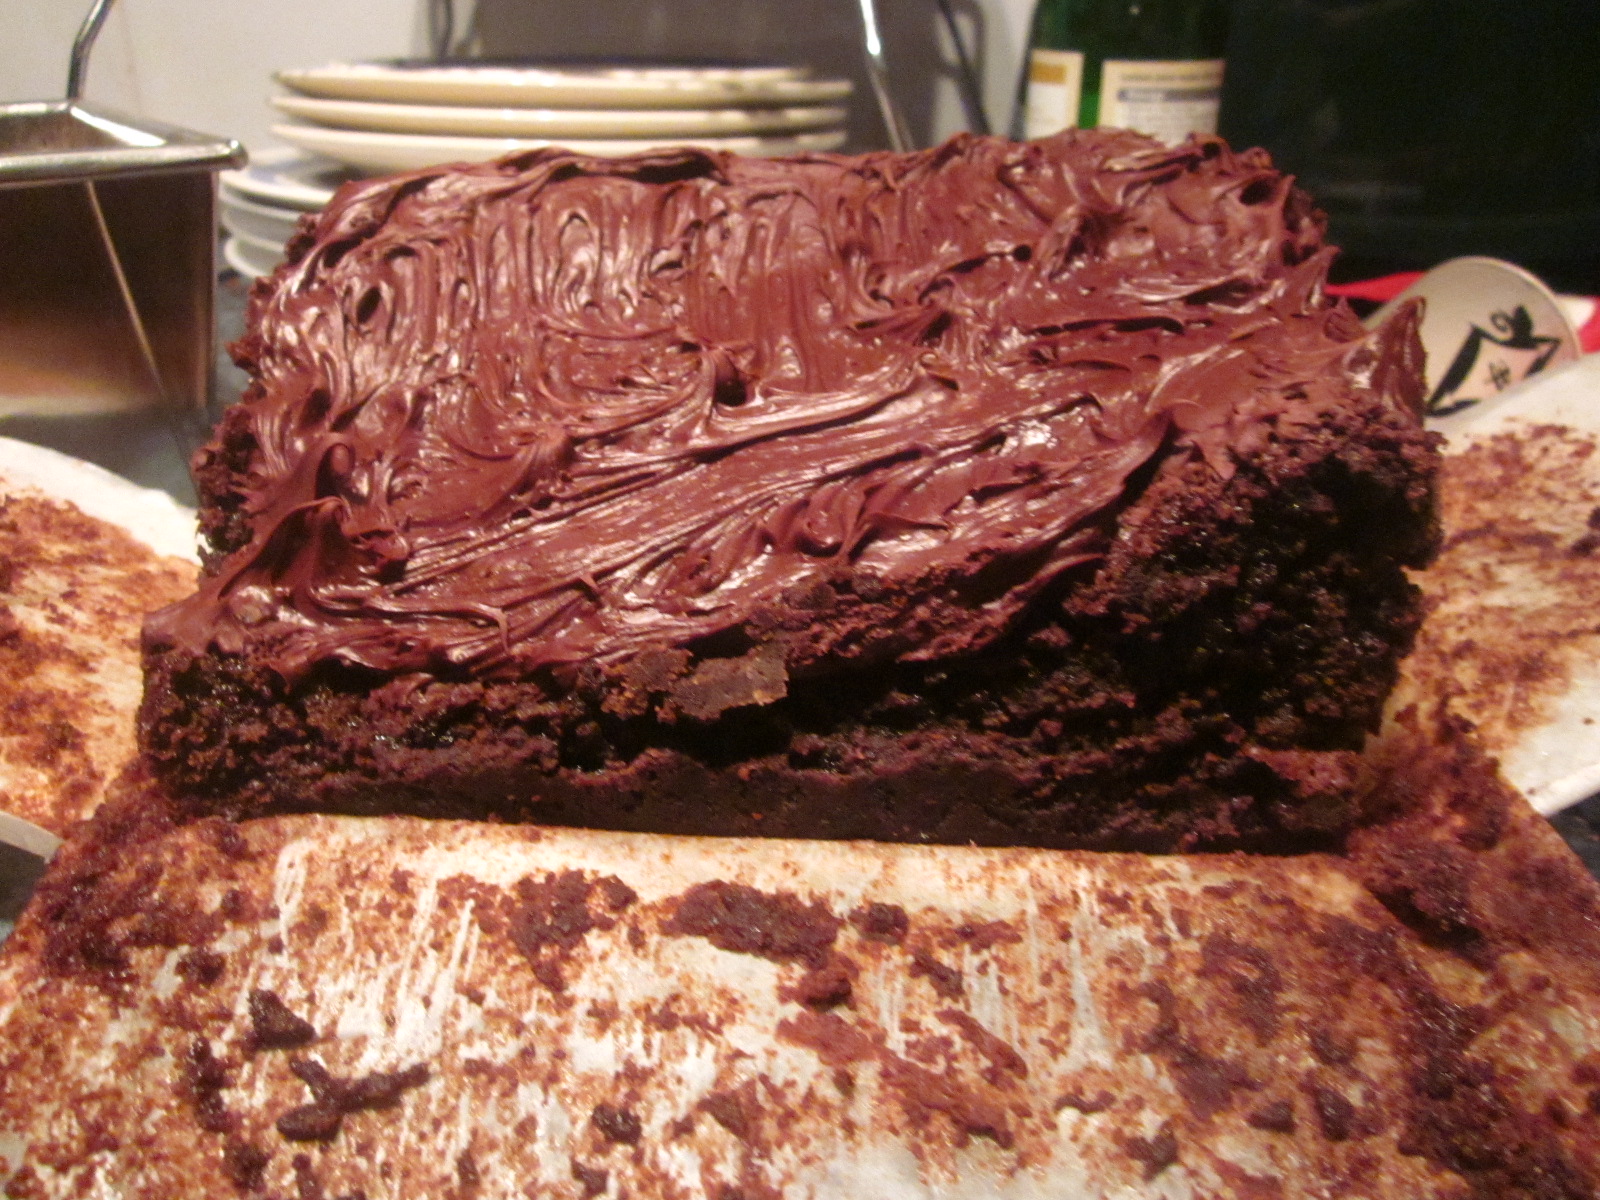
Looks like Sh*t, Tastes like Heaven Chocolate Cake.

Hi, I'm Samantha, AKA Geeky Sweetheart/The Geeky Seamstress. I blog about my sewing misadventures over at Geeky Sweetheart, preparing for mine and my husband's first child over at TeensyGeek, and the general crafty-geekiness that the bountiful interwebs provides every Tuesday on geekcrafts.com.

As you can see by the pictures above, I love food...  it's been more difficult for the last 16 weeks as I've been thrust into various states of nausea by my pregnancy, but this is one recipe that even a toilet bowl hugging pregnant woman will appreciate.

The name comes from when I made one of these cakes to take to work one Friday, and while I was off teaching one of my colleagues came came and sneaked a piece. She left me a note, it read
"Sorry Sam, I stole some cake. looks like shit, tastes like hevean, heaven."
The spelling error was even more funny at the time as I'm an RE teacher... but enough about me... lets talk about cake.

Looks like Sh*t Tastes Like Heaven Cake.

You will need:
a cake or loaf tin, greaseproof paper, butter for greasing the tin

160g good quality dark chocolate (60%+ cocoa solids)
160g butter
1tbsp instant coffe granules (or, if you're REALLY heavy metal, I used 1/2 shot espresso! BOOYAH)
68g Self raising flour
68g plain flour
1/4 tsp bicarb of soda
160g dark muscovado sugar
160g caster sugar
25g cocoa powder
3 medium eggs.

This recipe will take about 30 mins to prepare and then around 1hr 30 mins to bake... it's worth it.

I copped out and bought ready made frosting, to be honest, the amount of effort you put into this cake you won't want to be bothered making your own icing. You can buy it in tubs in the home baking isle of the supermarket and to be honest, it's great!

If you're thinking my measurements are a bit strange that's because I had to modify the quantities of the original recipe to fit in the loaf tin, this cake mix is quite sloppy, and if it rises over the top of your cake tin it will drip off the edges and burn all over the bottom of your oven. You will be well advised to put a baking tray in the bottom of the oven just in case... oven cleaning is no one's favourite activity.

(1) Preheat the oven to - fan 140c - conventional 160c and gas mark 3. Remember to put a baking tray in the bottom in case your cake mix rises over the tin.
(2) Butter and line your cake tin/loaf tin.
(3) Melt the chocolate and butter in a bain marie. Half fill a pan full of water and place a (heatproof!) dish on top, bring the water up to a boil then simmer, and while simmering stir the chocolate and butter in the bowl until it melts. Don't get water into the chocolate dumb ass! when it's melted add in the espresso or coffee granules dissolved in a tiny bit of water.
(4)  In another bowl, mix the 2 flours, bicarb of soda, sugars and cocoa. I would use a sieve to sift these dry ingredients. You might find the muscovado sugar doesn't sift too well... just do your best... it'll be right.
(5) beat your eggs, then add the egg and chocolate mixture into the dry ingredients (it's probably a good idea to turn off the chocolate-melting-pan a couple of minutes before you do this, just in case you accidentally cook the egg :-) ) Stir until you have a runny but smooth consistency (told you it was runny)
(6) whack it in the cake tin and chuck it in the oven. Bake for 1hr 25/1hr 30 mins. As always with cakes, if you stab it with a knife your knife should come out clean, the top should be firm, don't open the oven door if you can help it, but after the first hour or so it's probably a good idea to have a quick check to make sure it's not burning.

My cake sank like a battleship, don't worry, who the hell cares, even if it looks like sh*t it'll taste like hevean heaven. Leave it to cool then add some pre-made chocolate frosting. Eat within a week... it won't last that long.

 x G

Tuesday, 1 February 2011

Tonight we're gonna eat some soda bread, somewhere in this town...

I don't think the members of Thin Lizzy really ever ingested much that didn't come in powdered form, but they're a great Irish institution - as is this bread.

Home-made bread is a thing of beauty, but it can be a bit time-consuming.  Soda bread, on the other hand, is very quick and easy to make, as there's no kneading involved (note the use of bicarbonate of soda rather than the usual yeast).  It has a different texture to normal bread too - it's a bit more chewy.

This version uses a mixture of white and wholemeal flour but you can use all white if you want.

Ingredients:
  • 175g strong wholemeal bread flour
  • 175g strong white bread flour (plus extra for sprinkling)
  • 2 tsp bicarbonate of soda
  • Pinch of salt
  • 284ml buttermilk
  • Vegetable oil for lining the baking tray
Method:
1.  Stick the oven on at 200 degrees.  Line a baking tray with vegetable oil and baking parchment.  Sieve the flour into a bowl and mix in the other dry ingredients.

2.  Create a well in the centre and pour in the buttermilk.


3.  Mix the buttermilk in with a fork so that it forms a dough.  Add a little splash of normal milk if the dough isn't sticking enough.


4.  Using your hands, create a ball of dough and splat it down on the baking tray.  Make a cross in the top using a sharp knife - this looks good and allows the bread to expand as it cooks.

5.  Stick it in the oven for half an hour.  You can tell it's done if it sounds hollow when you tap the crust on the underside.  Sprinkle some flour over it and let it rest for about 10 minutes, then serve it, still warm, with butter and cheese.

Thursday, 27 January 2011

Chorizo Pasta Bake

Yip, another stodgy dish for those winter evenings. You can always have a smaller portion, and serve with salad, if you want the less guilty version...

You will need:

Pasta, cooked - preferably shapes, not long, thin or flat stuff, about 50-75g per person, depending on appetites ;-)

Chorizo - half a "ring" is more than enough for two people.

One onion

One tin of chopped tomatoes

Sweetcorn, fresh or frozen

Fresh tomatoes - some for the garnish

Mozzarella cheese (you can substitute any sort of cheese really)


 First of all, chop the chorizo into smallish pieces.  Add this to a pan over a medium heat - you don't need oil as the chorizo has plenty within. The chorizo will also release the garlic and paprika flavours that will flavour the whole dish.


Finely chop the onion and add it to the chorizo, keeping the heat at a medium level. Slowly allow the onion to soften; it will absorb some of the oil and the flavouring.

 Add the sweetcorn to the pan once the onions have softened, and leave for another 2-3 minutes.


 Add the tinned tomatoes, and the cooked pasta to the pan. You can also add some chopped, fresh tomatoes. Leave to simmer for 10-15 minutes.
 Place in an oven-proof dish, and then top with slices of mozzarella and tomato. Bake in a pre-heated oven at about 180C for 20-25 minutes, until the cheese is golden-brown.
 Bon appetit!

Saturday, 22 January 2011

Necroflapjacks

More fun with porridge oats, and with a Slayer themed title as well.  Marvellous.

I've been watching that "Baking Made Easy" programme with Lorraine Pascale recently, and I find it very hard to believe that she really eats the stuff she bakes on the programme, given that (1) she used to be a famous model and (2) she puts a metric tonne of butter in every recipe.  Still, I'm not complaining.  I did, however, make my flapjacks slightly differently to her - there's no lemon (!?!?!!???!!?!?!) in this recipe and I used a bit of honey as well as golden syrup.

This an easy recipe if you've got the bits lying around at the weekend and you fancy a heart attack with a cup of tea.  You basically want equal quantities of muscovado sugar, butter and golden syrup/honey and double that quantity of porridge oats.  The syrup/honey thing is a matter of preference, so feel free to use one or the other exclusively if you prefer.

Ingredients:
  • 175g butter (yes you read that correctly)
  • 175g muscovado sugar
  • 175ml golden syrup/runny honey/both
  • 350g porridge oats
Method:
  1. Preheat the oven to 150 degrees.
  2. On a very low heat, melt the butter in a saucepan completely.  Stir in the sugar, and when it's all melted add the syrup/honey/both.  Remove the pan from the heat and stir in the porridge oats until you've got a thick gloopy mix.
  3. Pour the mixture into a lined baking tray and spread the love around, then put it in the oven for 40 minutes.  You can do it for longer if you like but this way will leave the mixture a bit gooey in the middle, which is what God intended.
  4. Cool the mixture in the tin for about 15 minutes so that it sets a bit.  Carefully transfer the mix in the baking parchment to a chopping board and cut it into squares - you want to do this while they're still warm.

Tuesday, 18 January 2011

Death by Chickpeas

I was going to try to make some pun about "chick(pea)s" for the title of this recipe in order to try and tie it in with metal somehow.  For the good of all humanity, I decided against it.

I once read that the way to learn how to make proper curries is to experiment with spice combinations until you find one that you like.  I've found that to be very true - I use basically the same mix for chicken, beef and now the humble can of chickpeas.  The latter is a cheap, healthy and quick-to-cook store cupboard essential, and the curry makes them a little bit more interesting!  Also, if you don't like chickpeas you could probably do this with mushrooms.

This recipe will serve two average-sized headbangers with a bit left over for seconds.

Ingredients:
  • 2 x 400g cans of chickpeas
  • 2 tbsps tomato puree
  • 150g basmati rice ("easy-cook" rice is for retards)
  • 3 tbsps Greek yoghurt (not the low fat crap)
  • A medium sized chilli
  • 2 x garlic cloves
  • A medium sized onion
  • 4 x cardamom pods
  • 4 x cloves
  • 2 x bay leaves
  • Salt and freshly ground black pepper
  • 2 tbsps vegetable oil
  • Juice of one lemon
And for the powdered spice mix:
  • 1 x tbsp chilli powder
  • 1 x tbsp turmeric
  • 1 x tbsp ground ginger (use fresh if you prefer)
  • 2 x tbsp ground coriander
  • 1/2 tsp ground cumin
  • 1/2 tsp garam masala
  • 1/2 tsp cinnamon
Method:
  1. Put the basmati rice in a pan with some cold water.  Drain it after 20 minutes and put it back in the saucepan with fresh water (you want a ratio of roughly 1 part rice to 1.5 parts water).  Add a little salt and bring it to the boil, then turn the heat right down and cover it for about 10 minutes - this will enable the rice to steam and make it nice and sticky.  Drain it if necessary and leave it to rest for about 15 minutes while you get on with the curry.
  2. Meanwhile, simmer the chickpeas in the water that comes in the cans for 3-4 minutes, then drain them, put them back in the pan and set them aside.
  3. Finely chop the garlic and chilli - leave the seeds out if you want a milder version (pussy).  Chop the top off the onion and peel it.  Bring all the powdered spices together in a bowl.  The idea is that you get everything ready to go for the next stage as you won't have time to faff.
  4. Make a masala - heat some oil in a non-stick wok on a medium heat and add the bay leaves, garlic, chilli, cloves and cardamom.  When it's fragrant (which should take about 30 seconds) grate the onion into the wok and stir it well.  When the onion has softened add the powdered spices and seasoning, stirring it in well and adding a bit more oil if necessary.  When the powdered spices are fragrant, which should take about 10 seconds, stir in the tomato puree and then the chickpeas, lemon juice and yoghurt.
  5. Cook the curry through for a few minutes, check the seasoning and serve it  with the rice (or naan bread if you prefer).